Author: nomadadmin

BankingHow to Get Started with OKX & Web3 Wallet: The Complete Beginner-to-Pro Guide for Digital NomadsFor global digital nomads, international freelancers, and modern investors, cross-border payments and sovereign asset storage are rapidly shifting toward cryptocurrency.…Get a Hong Kong Mobile Number from HK per year with Club Sim eSIMConnectivityHow to Keep an Active Hong Kong Phone Number for HK$15/Year: Club Sim eSIM Complete GuideFor global digital nomads, international investors, and location-independent professionals, having access to a reliable, low-cost international phone number is an…How to Open a UK Monzo Bank Account as a Global Digital Nomad - The Complete Mechanics & GuideBankingHow to Open a UK Monzo Bank Account as a Global Digital Nomad: The Complete Mechanics & GuideFor global digital nomads, remote workers, and cross-border entrepreneurs, having access to Tier-1 banking rails in the United Kingdom is…

Author: nomadadmin

  • How to Get Started with OKX & Web3 Wallet: The Complete Beginner-to-Pro Guide for Digital Nomads

    How to Get Started with OKX & Web3 Wallet: The Complete Beginner-to-Pro Guide for Digital Nomads

    For global digital nomads, international freelancers, and modern investors, cross-border payments and sovereign asset storage are rapidly shifting toward cryptocurrency. Whether you need to receive international client retainers in USDT without intermediary wire deductions, diversify your net worth into Bitcoin, or participate in the burgeoning decentralized Web3 ecosystem, understanding how to navigate the cryptocurrency landscape has become an essential modern literacy.

    While the decentralized blockchain underpins all crypto assets, interacting directly with raw smart contracts poses high technical friction and steep security risks for beginners. This is where Centralized Exchanges (CEX) step in: acting as the modern banks and prime brokerages of the digital economy, they provide compliant fiat onramps, high liquidity, and customer safeguards. Among the world’s premier tier-1 crypto platforms, OKX stands out with over 50 million global users, an industry-leading user interface, and the world’s most powerful integrated Web3 self-custody wallet.

    In this definitive master guide, I will take you from zero to expert: covering how to register with a lifetime 20% trading fee discount, how to safely convert fiat into stablecoins via C2C without triggering banking freezes, how to buy your first fractional Bitcoin with zero fees, and how to configure cold-storage security for your OKX Web3 wallet.
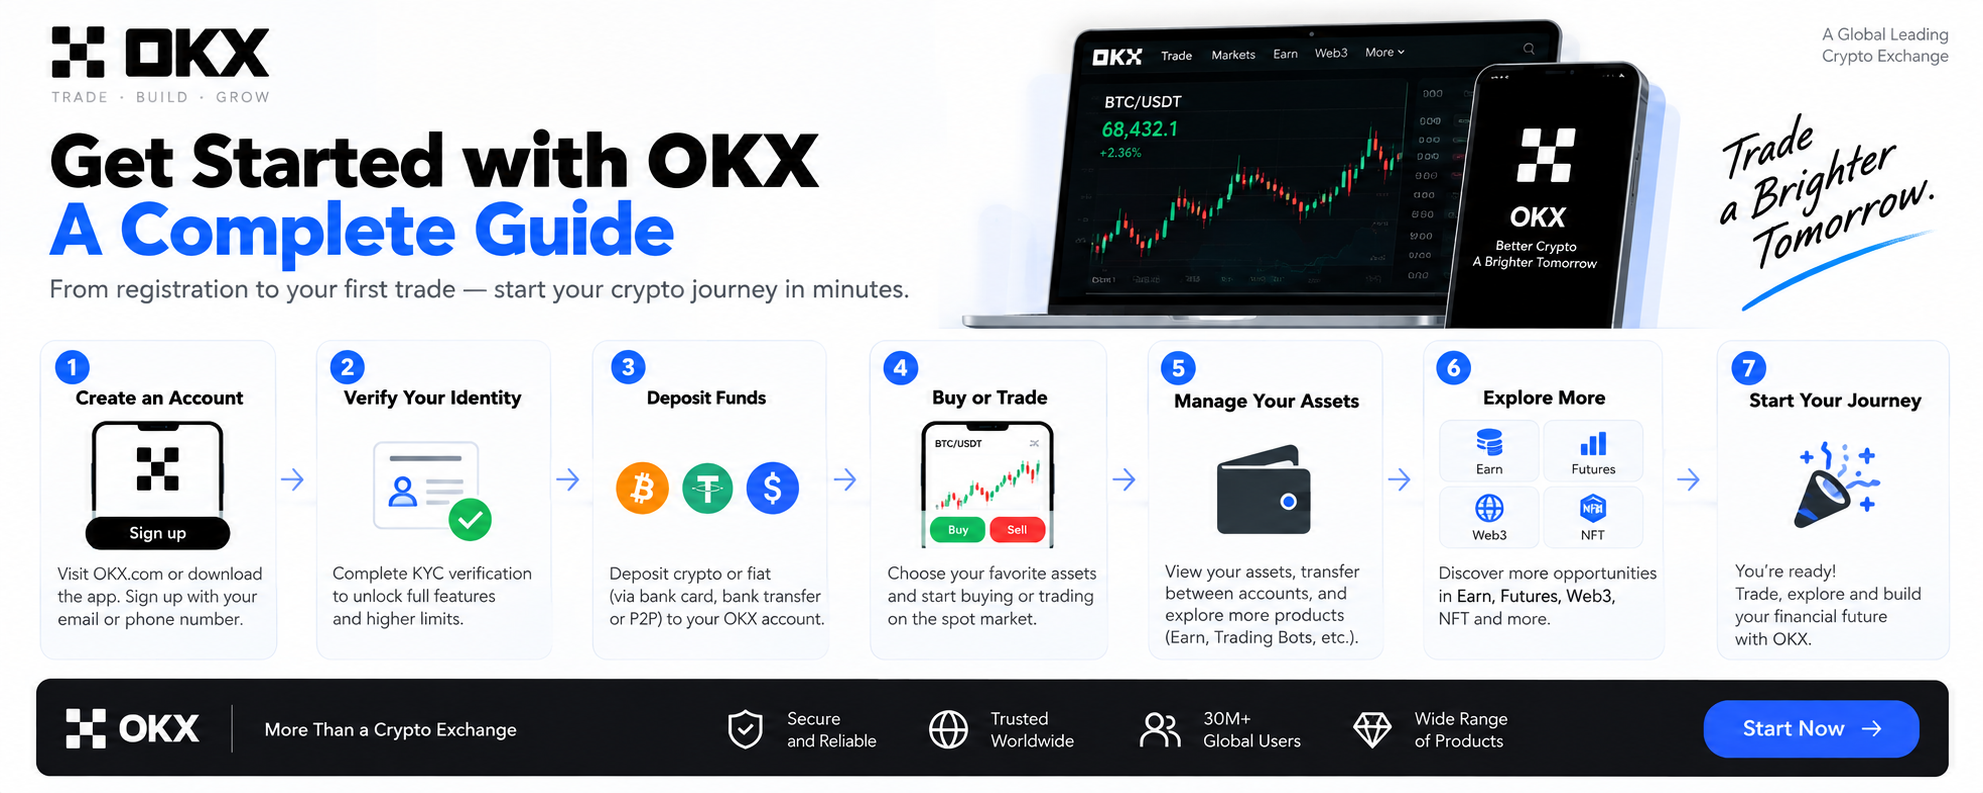
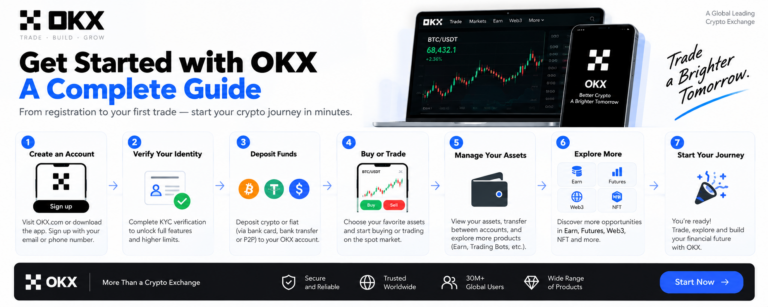
    Get Started with OKX: A Complete Guide from registration to Web3 storage
    The complete OKX onboarding journey: from account registration to your first crypto trade and Web3 cold backup.

    Core Concepts Every Nomad Must Know Before Starting

    1. What is USDT and Why is it the “Universal Chip”?

    Before making any trades, you must understand USDT (Tether). Unlike volatile cryptocurrencies like Bitcoin or Ethereum, USDT is a stablecoin pegged 1:1 to the US Dollar. Tether maintains reserves in US Treasury bills and cash equivalents to guarantee that 1 USDT can always be redeemed for $1.00 USD.

    Think of a centralized exchange like a global financial playground: USDT is the universal chip. Purchasing cryptocurrencies directly with various national fiat currencies often incurs poor conversion rates and wide bid-ask spreads. The standard, cost-efficient path is always: Local Fiat Currency → Convert to USDT → Trade USDT for Bitcoin, Ethereum, or other assets.

    2. The Dual-Engine Architecture: Exchange (CeFi) vs. Web3 Wallet (DeFi)

    Inside the OKX mobile application, you will notice a toggle at the very top:

    • Exchange (Left Tab): The centralized custodial exchange. OKX manages the internal ledger, matches orders with lightning speed, and provides fiat on/off ramps (C2C trading).
    • Web3 Wallet (Right Tab): A decentralized, non-custodial software wallet. You own the private keys and 12-word seed phrase. OKX cannot freeze, view, or control your funds here. It is your passport to decentralized finance (DeFi), NFT marketplaces, cross-chain swaps, and token airdrops.
    OKX App interface showing Exchange and Web3 Wallet tabs
    The dual interface: Centralized Exchange on the left, Decentralized Web3 Wallet on the right.

    Part 1: Account Registration & The 20% Lifetime Fee Rebate

    The single most expensive mistake beginners make is clicking directly on the OKX homepage to sign up without an affiliate link. OKX’s system architecture operates on a strict referral commission model: if you sign up cold, you pay 100% standard trading fees. If you register through an authorized partner link, you automatically receive a lifetime 20% rebate on all trading fees.

    Over months and years of dollar-cost averaging and portfolio rebalancing, a 20% fee rebate translates into hundreds or thousands of dollars saved.

    1. Use the Verified Discount Link: Access the official registration portal via OKX 20% Rebate Registration (Referral Code: OY778).
    2. Select Your Country/Region: Select your true country of legal residence. For Chinese mainland residents, choose “China” (OKX fully supports mainland user identity verification).
    3. Email Selection (Pro Tip): Always register using an international email provider — Gmail or Outlook is highly recommended. Domestic email providers often trigger aggressive spam filters or deliver OTP codes with delays.
    4. Enter 6-Digit OTP: Retrieve the one-time verification code sent to your email, establish a high-entropy password, and enable a Passkey (using Touch ID, Face ID, or your device PIN) for phishing-proof security.
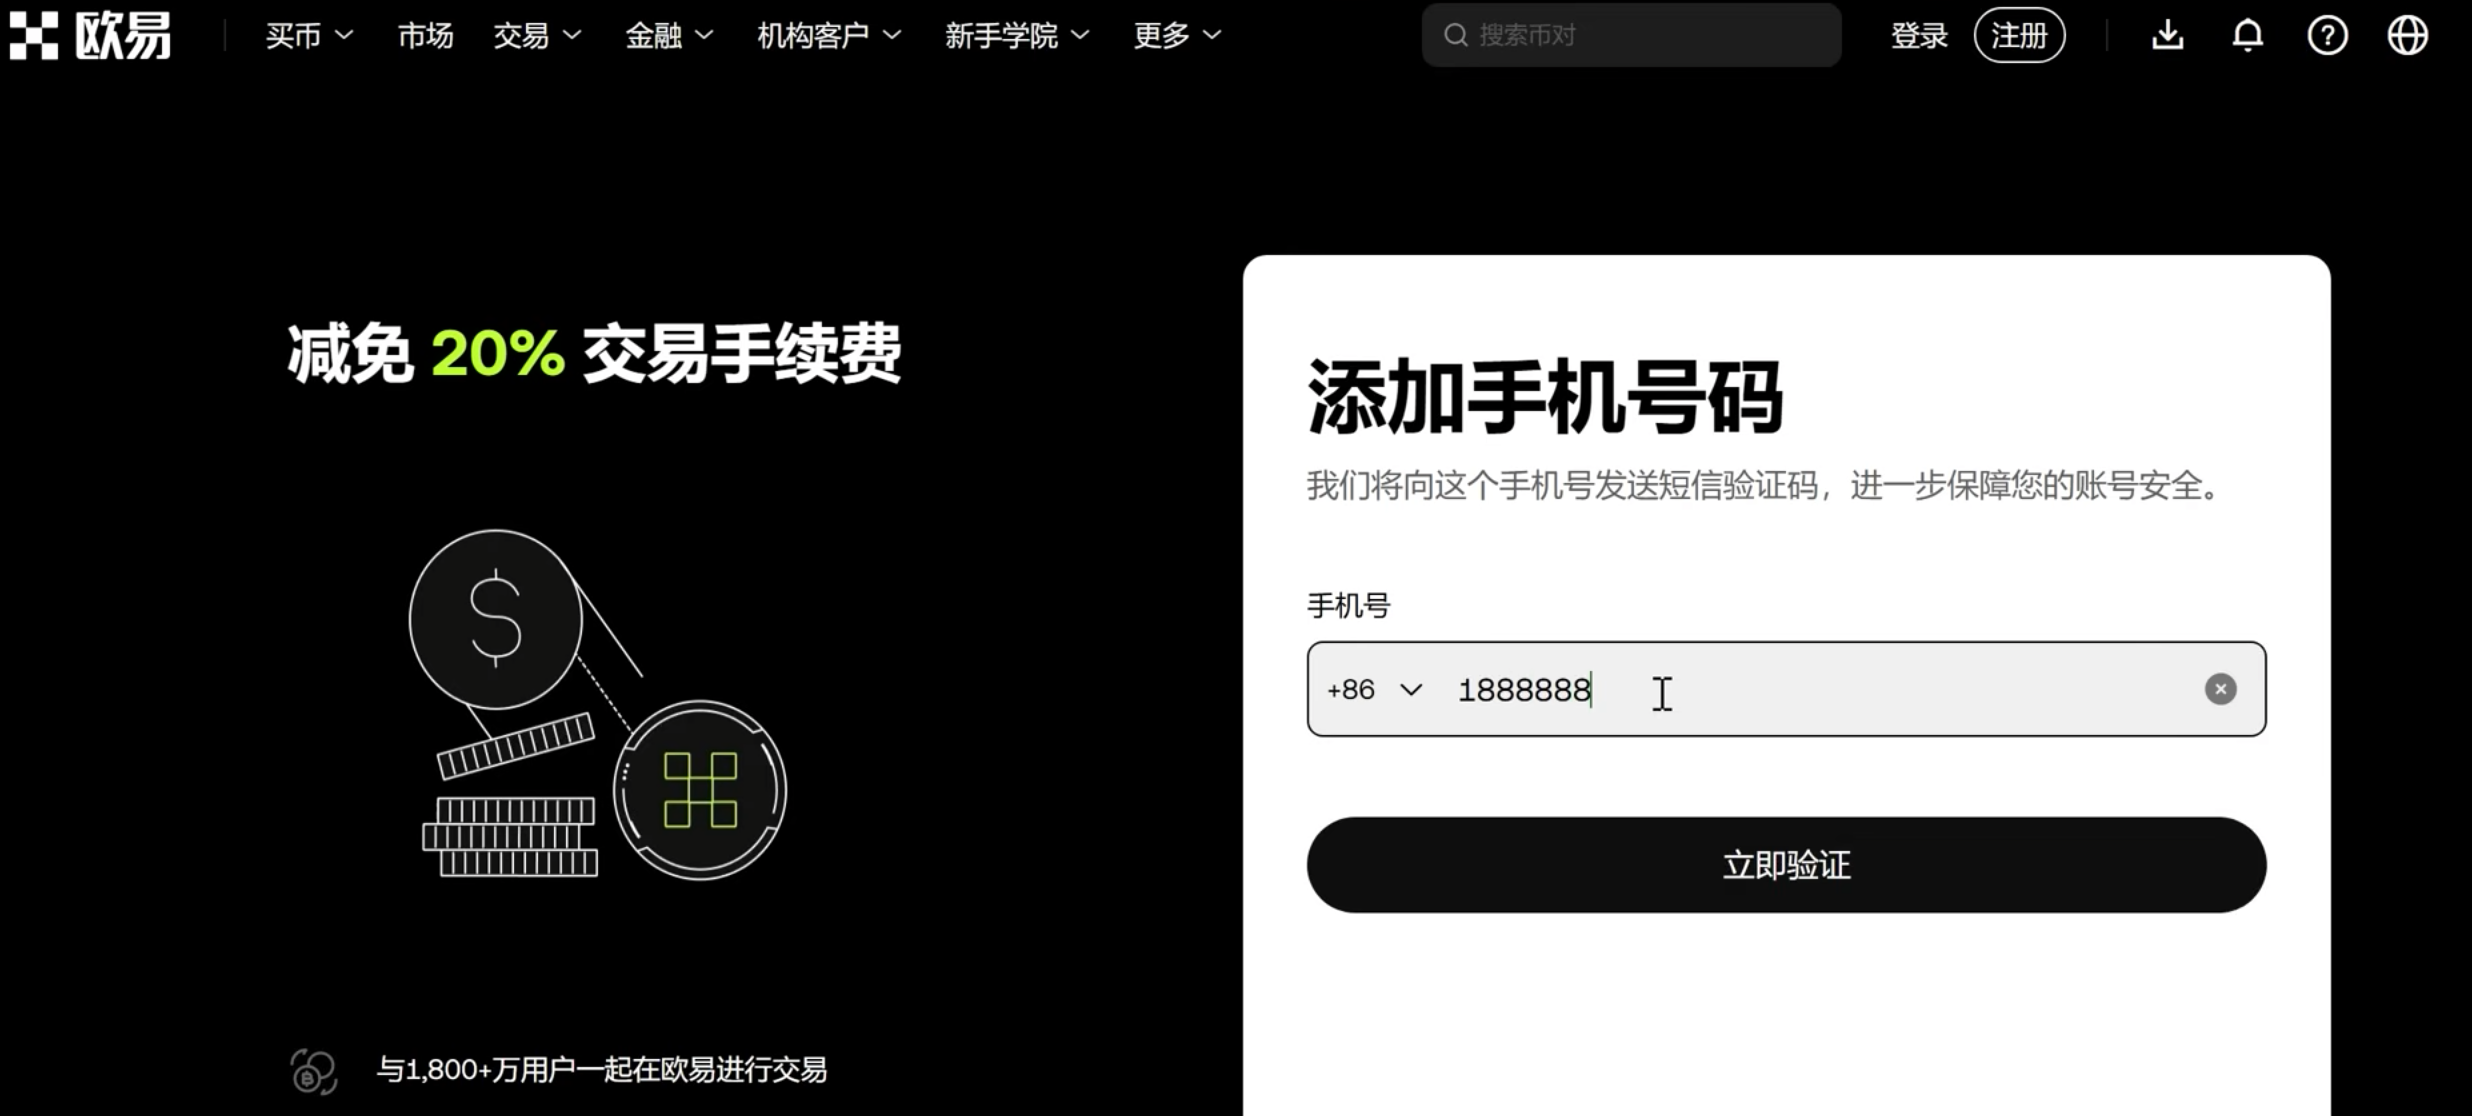
    OKX Official Web Registration Page
    The official OKX registration portal with referral discount parameters enabled.

    Part 2: Downloading the Official App & Regional Store Bypass

    While basic account management is available on desktop, real-time trading, biometric authorization, and Web3 interactions require the mobile application.

    The iOS App Store Solution

    Apple restricts cryptocurrency exchange applications within certain national App Stores (such as Mainland China). If searching for “OKX” yields zero official results, your Apple ID region is restricted.

    The Fix: Switch your App Store to a non-restricted regional Apple ID. Taiwan and South Korea Apple IDs are the most reliable options because they feature zero crypto app restrictions and support both OKX and countless Web3 ecosystem dApps. Once you switch accounts in the App Store, search “OKX” and download the official client immediately.
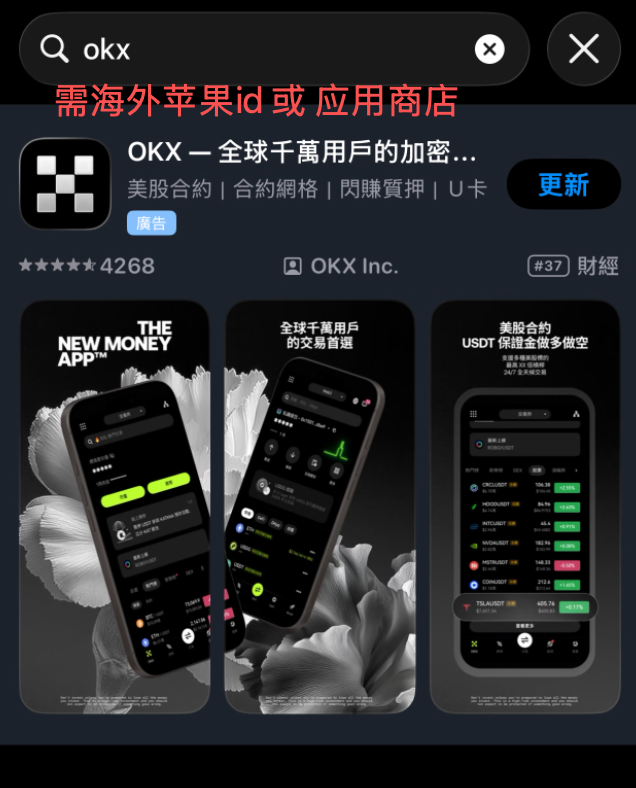
    Search OKX on overseas Apple App Store
    Search and install the official OKX app using an overseas regional Apple ID.

    Android Installation

    Android users can download directly from the Google Play Store or download the official, cryptographic signed APK file directly from the official OKX.com website.

    Part 3: Identity Verification (KYC) & Compliance Tips

    Under international Anti-Money Laundering (AML) standards, identity verification is mandatory before depositing fiat or transacting on C2C desks. Unverified accounts cannot withdraw funds or execute peer-to-peer trades.

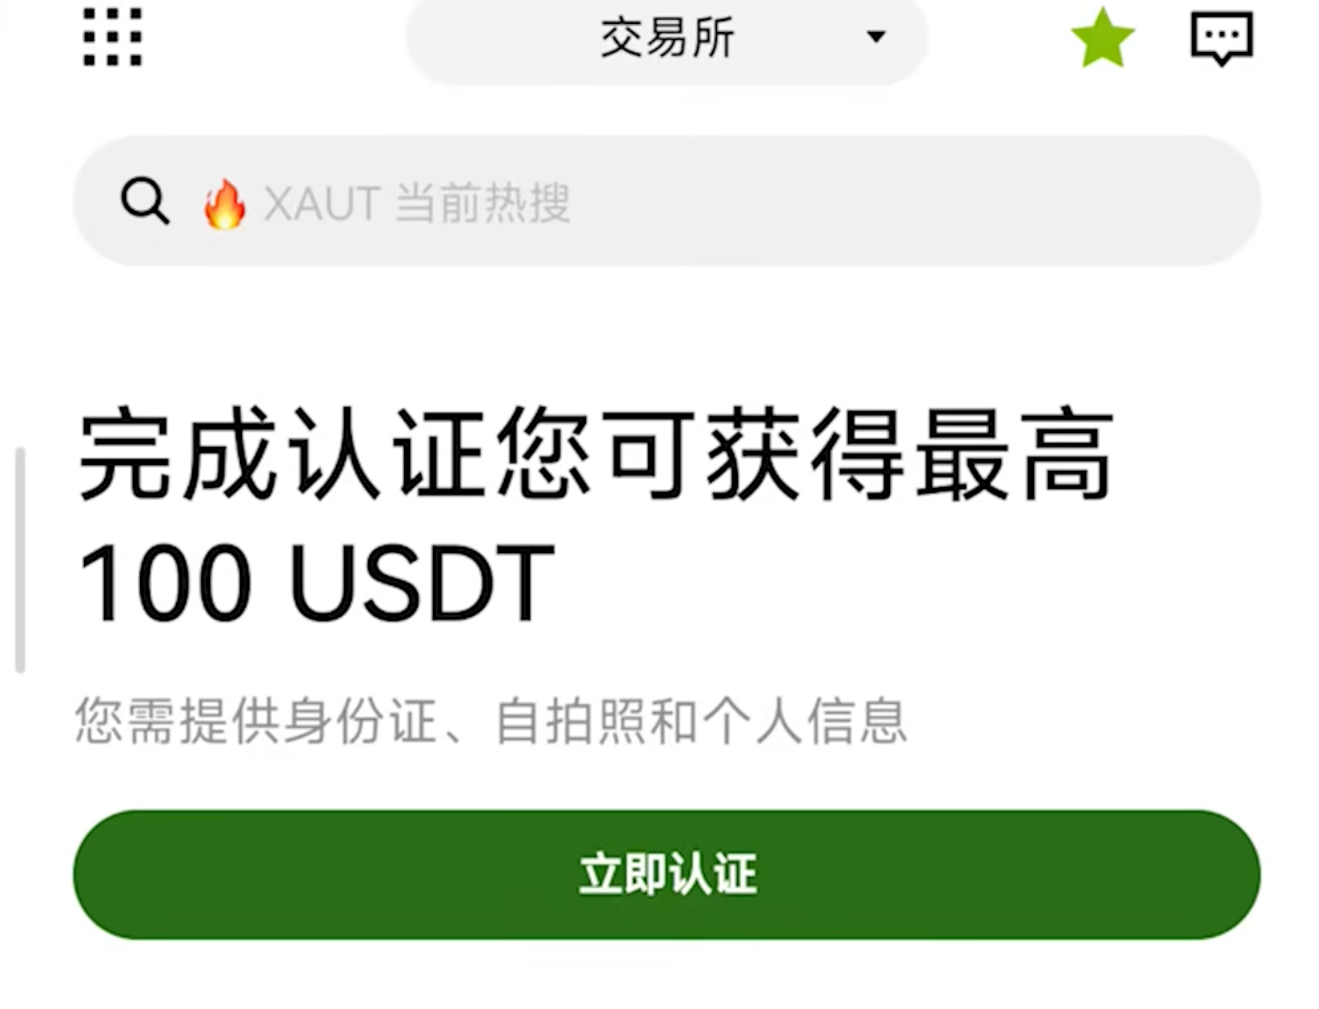
    1. Open the OKX app, tap the user icon on the top left, and select “Identity Verification”.
    2. Select your document type: Mainland Chinese residents can select National ID Card; international nomads can select Passport.
    3. Photograph the front and back of your document clearly, ensuring zero glare or obscured corners.
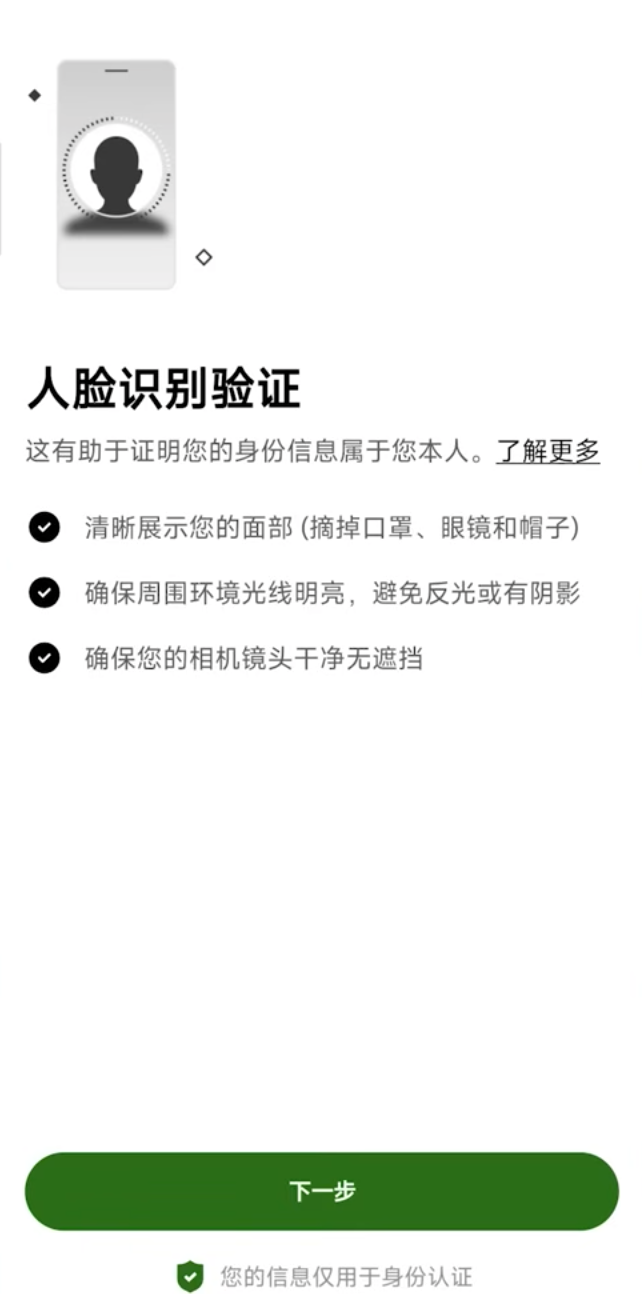
    4. Complete the automated 3D facial recognition scan. Automated clearance typically takes under 60 seconds.
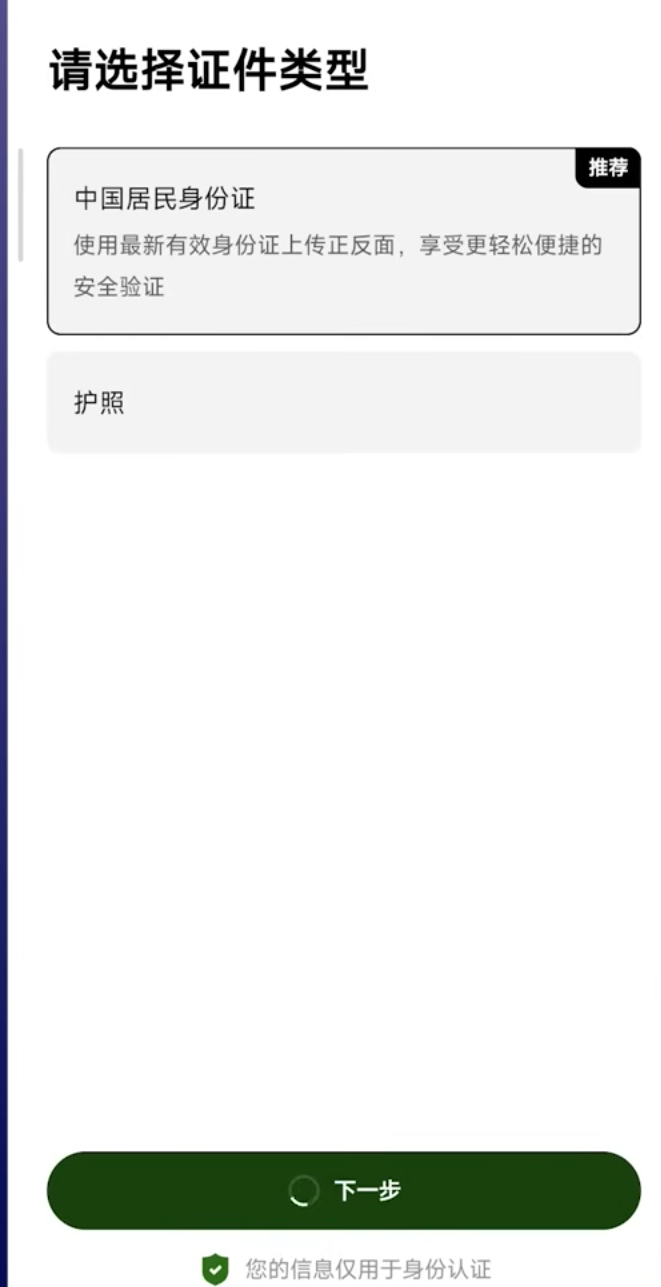
    Select ID document type in OKX App
    Choose your identity document type for instant automated verification.
    Facial liveness verification in OKX App
    Complete the rapid 3D facial liveness scan.

    Pro Tip for Video Verification Upgrades: Standard verification grants a 20,000 RMB C2C limit. If you wish to unlock higher transaction tiers, OKX will ask for a short recorded video selfie. You must turn off your VPN/proxy during this video scan, as active proxy nodes create geographic telemetry conflicts that trigger network error warnings.

    Part 4: C2C Fiat Onramp & The Anti-Freeze Survival Playbook

    To convert your local fiat currency into USDT, navigate to the homepage and tap “Deposit” → “C2C Trading”. In C2C (Customer-to-Customer) trading, OKX acts as an escrow guarantor: the seller’s crypto is locked in smart contract escrow the moment you place an order, guaranteeing that your funds are safe as long as you follow platform rules.
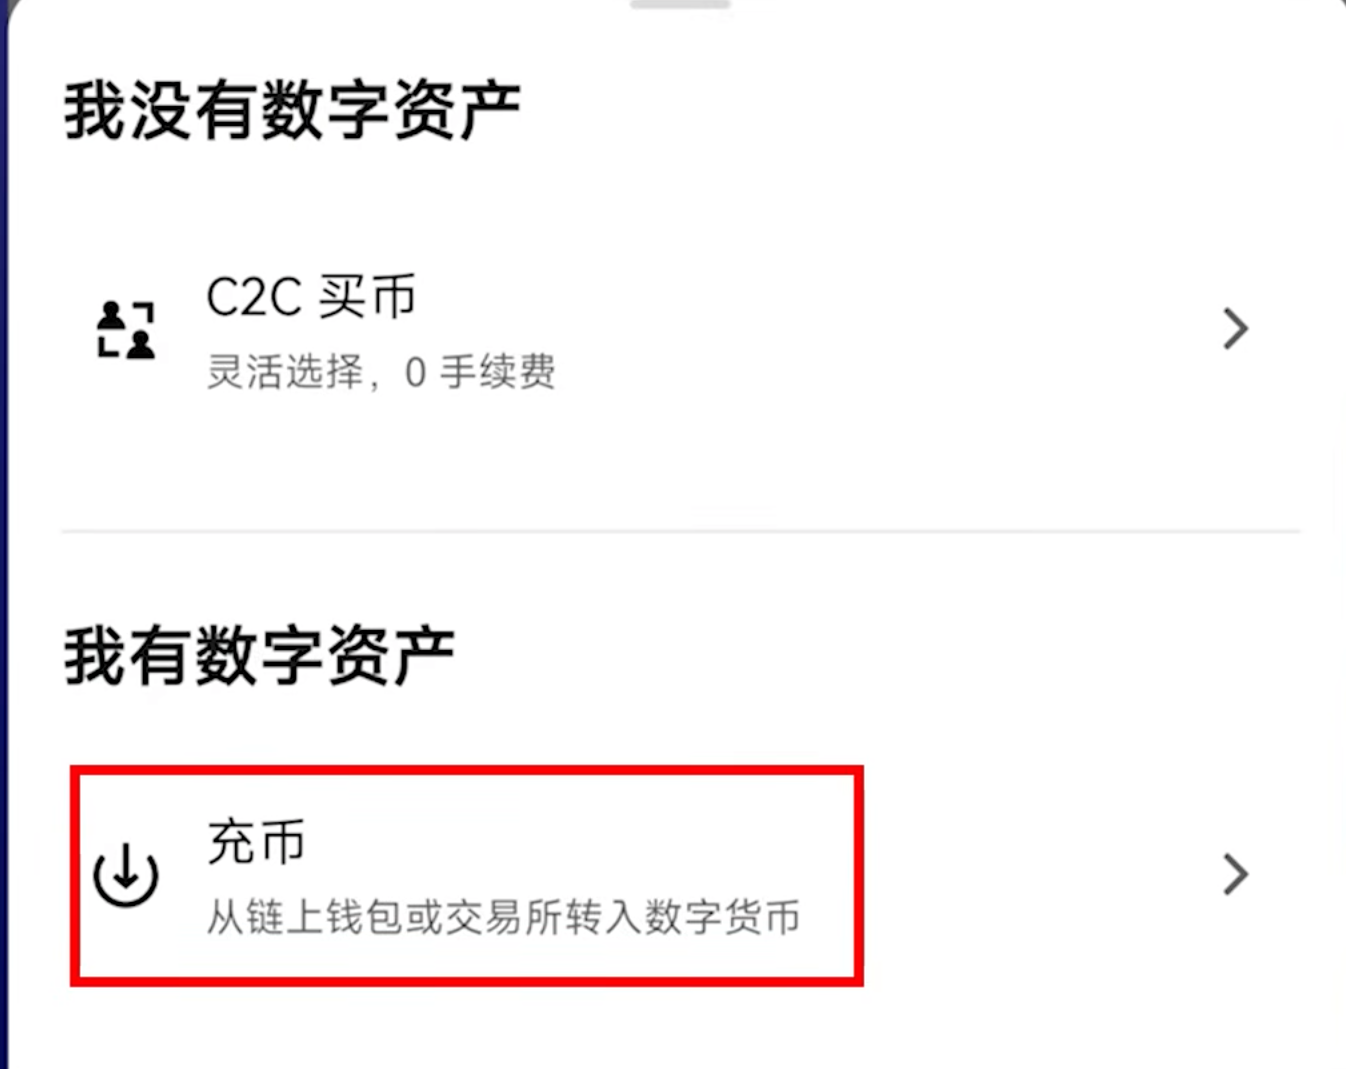
    OKX C2C trading entry screen
    Access C2C trading with zero platform service fees.

    The Three Golden Rules of Merchant Vetting

    1. Always Use the “Custom Selection” (自选区): Never click “Express / Quick Match”. The Express tab pairs you algorithmically, often matching you with newer or lower-reputation merchants. The Custom Selection tab lets you inspect merchant track records with full transparency.
    2. Audit the 3 Quality Indicators: Prioritize merchants with: (a) Thousands of completed orders, (b) A 30-day completion rate of 98% or higher, and (c) Verified V-merchant or “Beginner Friendly” badges.
    3. Payment Channel Isolation: When paying via Alipay, WeChat Pay, or bank transfer, use a secondary payment account rather than your primary daily livelihood account. Segregating trading funds from daily living expenses is standard operational hygiene.
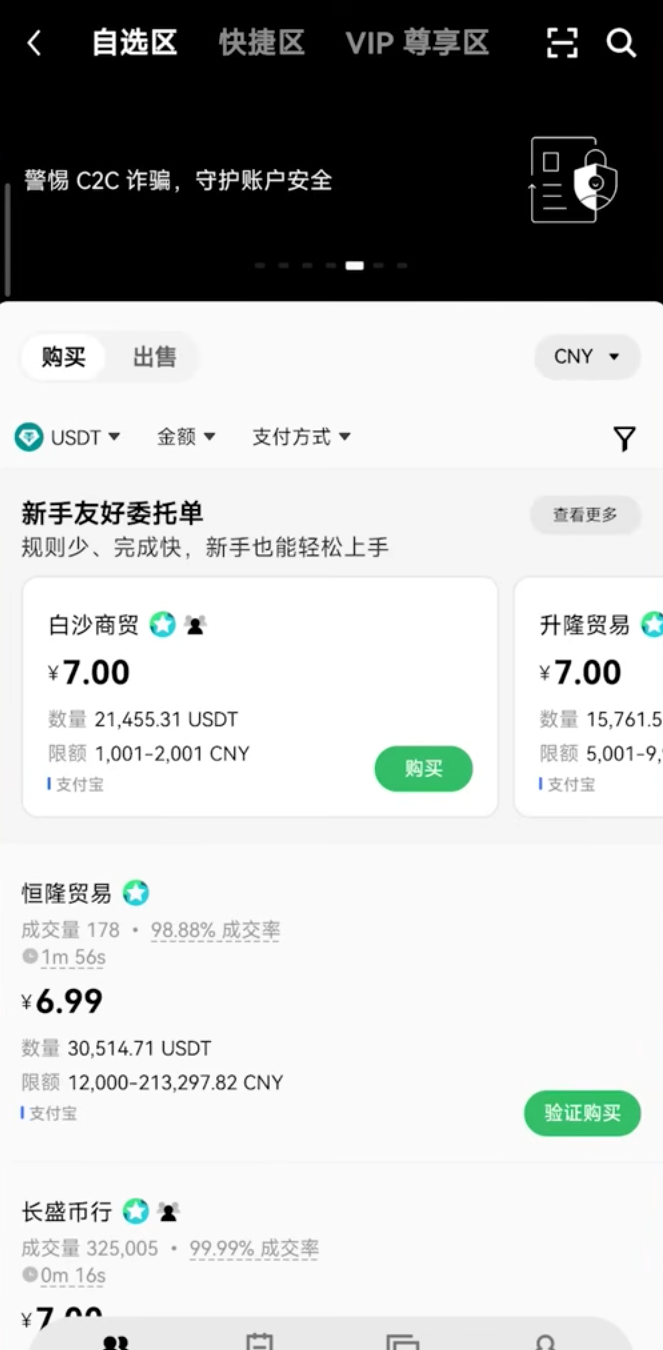
    OKX C2C Custom Selection Merchant List
    Inspect order volumes, completion rates, and merchant certification badges.

    The Fatal Mistake: Transfer Remarks

    NEVER write words like “USDT”, “OKX”, “Bitcoin”, “Crypto”, or order numbers in the payment transfer remarks. Banking and mobile payment algorithms constantly scan transaction remarks for crypto-related keywords. Writing any crypto terminology will immediately trigger anti-fraud freezes on both your account and the merchant’s account. Leave the remark completely blank.

    Once you transfer the exact amount, take a screenshot of your payment receipt, return to the OKX app, and tap “I Have Paid”. The merchant will verify receipt of funds on their end and release the escrowed USDT directly into your Funding Account.

    Part 5: Buying Your First Crypto: Convert (0 Fee) vs. Spot Market

    Once you hold USDT, you have entered the global crypto market. You can purchase Bitcoin, Ethereum, or any supported asset. Remember: Bitcoin is divisible down to 8 decimal places (0.00000001 BTC = 1 Satoshi). You do not need $60,000+ to own Bitcoin; you can purchase $10 or $50 worth of Bitcoin at exact market proportions.

    Option A: Instant Convert / Flash Swap (Beginner Friendly, 0 Fees)

    For absolute beginners, navigating raw order books can be intimidating. OKX provides a built-in Convert (闪兑) feature:

    • Tap “Trade” → “Convert”.
    • Select “From USDT” and “To BTC”.
    • Input your amount (e.g. 100 USDT).
    • Click “Preview Quote” and confirm. There are zero transaction fees, and your BTC arrives in your account instantly.
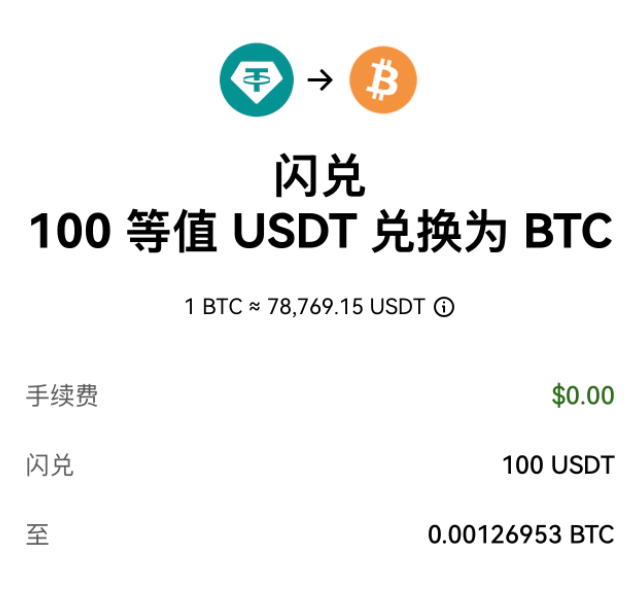
    OKX Convert Flash Swap interface
    The zero-fee Convert interface: instant execution without order book complexity.

    Option B: Spot Trading (Standard Market Orders)

    When you are ready to trade on the open market, navigate to the Spot (现货) tab:

    • Select the BTC/USDT trading pair.
    • Choose your order type: Market Order executes immediately at the current best available price; Limit Order allows you to specify a target price and waits for the market to fill it.
    • Enter your purchase amount and tap “Buy BTC”.
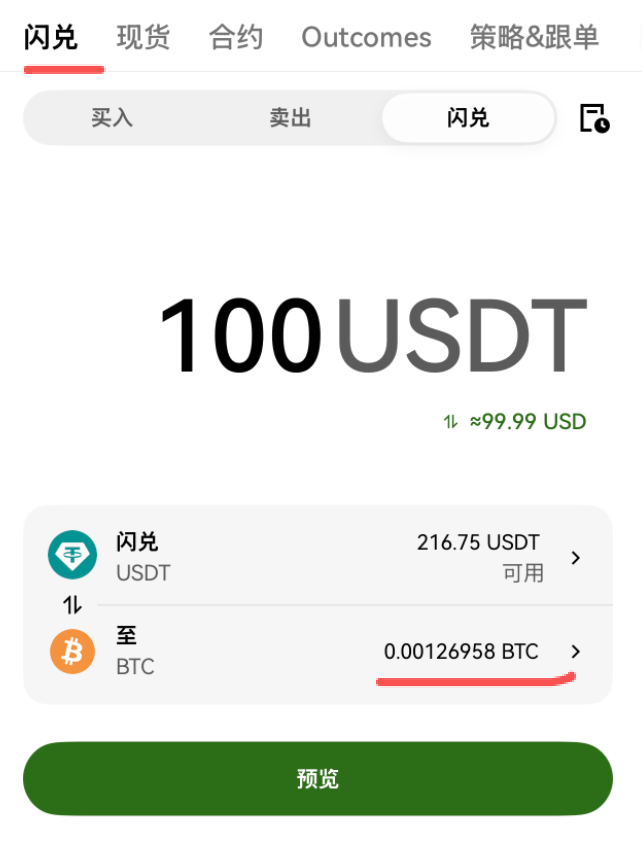
    Select Spot Trading mode in OKX
    Select Spot trading to own the underlying asset outright. Avoid Futures and Leverage as a beginner.

    Golden Rule for Beginners: Stay strictly within the Spot market. Ignore high-leverage products like Futures, Contracts, and Options, which are designed for professional hedgers and carry catastrophic liquidation risks.

    Part 6: On-Chain Transfers & The “Courier” Network Rule

    When transferring crypto to an external wallet or another exchange (such as transferring USDT between OKX and Binance), you will use the Deposit / Withdraw function. Understanding blockchain networks is vital to protecting your capital:

    • The Courier Analogy: Blockchains are like competing postal courier networks (TRC20, ERC20, Arbitrum, Solana). The sender and the receiver must select the exact same network. If you send USDT over TRC20 to an ERC20 address, your funds will vanish into an unrecoverable blockchain void.
    • Network Recommendation: For moving USDT, TRC20 (Tron) remains the global industry favorite due to $1–$2 transfer costs and sub-minute confirmations. For Bitcoin transfers, use the native Bitcoin network.
    • Gas Fees: Every on-chain transfer requires a network fee (Gas) paid to decentralized validators. This fee fluctuates based on real-time network congestion.

    Part 7: Creating & Cold-Storage Securing Your OKX Web3 Wallet

    The famous crypto adage states: “Not your keys, not your coins.” While keeping funds on OKX Exchange is convenient for trading, holding substantial wealth long-term requires self-custody. OKX’s integrated Web3 Wallet is one of the most powerful self-custody multi-chain wallets in the industry.

    Toggle the top switch to “Web3 Wallet” and select “Create Wallet” (do not choose Import).
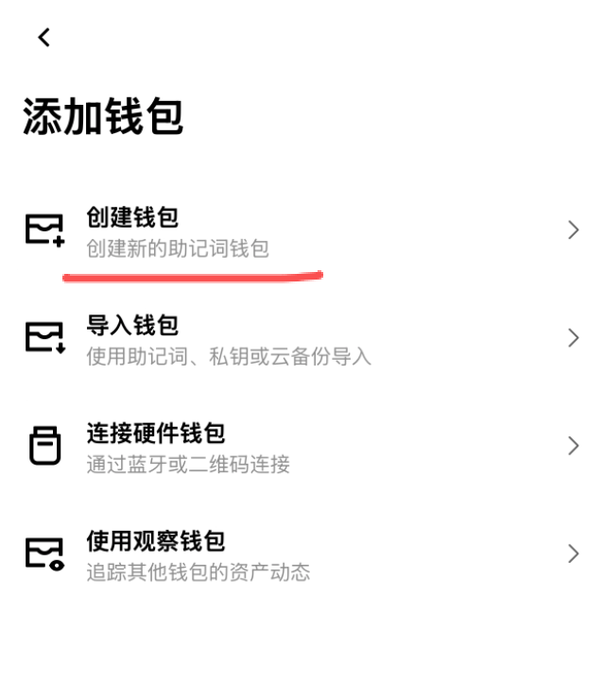
    Create new Web3 Wallet in OKX App
    Select ‘Create Wallet’ to generate your sovereign on-chain identity.

    The Air-Gapped Seed Phrase Protocol (Never Compromise This)

    Your wallet’s 12-word recovery phrase (Seed Phrase) is the master mathematical key to all your on-chain assets. Anyone with these 12 words can drain your wallet in seconds from anywhere in the world. Follow this air-gapped protocol strictly:

    1. Disconnect & Air-Gap: Turn off your Wi-Fi and enable Airplane Mode on your smartphone before revealing the words.
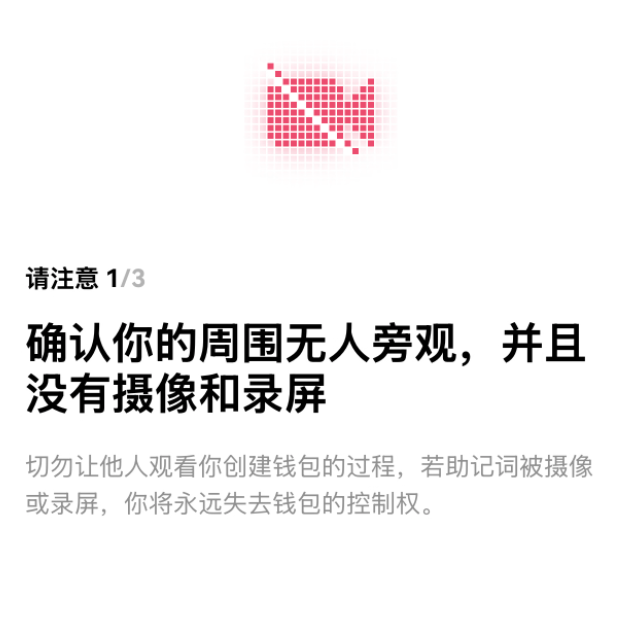
    2. Environment Check: Ensure no one is behind you, and confirm no security cameras or screen-recording software are active.
    3. Pen and Paper Only: Use a physical pen and paper to write down all 12 English words in exact sequential order. Create two physical copies and store them in separate, fireproof locations.
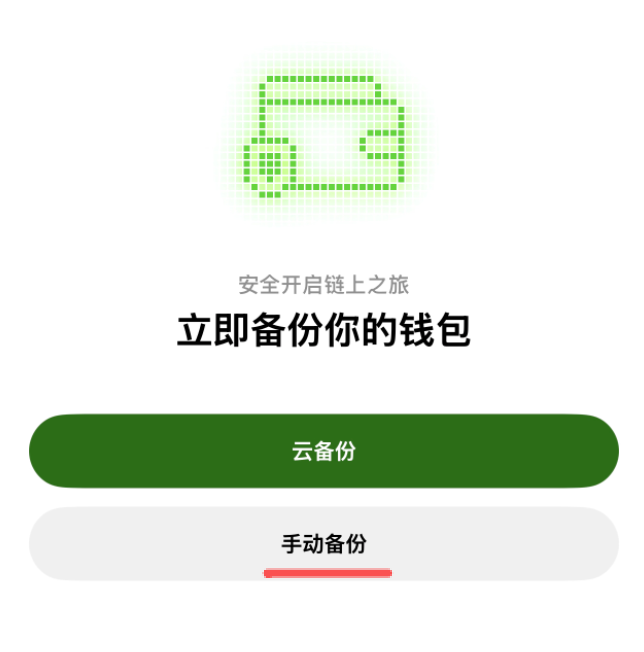
    Select manual backup for Web3 wallet
    Choose ‘Manual Backup’ to physically record your seed phrase offline.
    Safety prompt before viewing seed phrase
    Confirm the environment is free of onlookers, cameras, and screen recording.

    The Fatal Digital Sins to NEVER Commit:

    • ❌ Never take a screenshot (photos automatically sync to iCloud/Google Photos cloud storage).
    • ❌ Never copy-paste into WeChat, WhatsApp, Telegram, or email draft boxes.
    • ❌ Never save in digital notes or cloud password managers. Over 80% of crypto asset thefts originate from digitally leaked seed phrases.

    After recording the words, the app will ask you to verify specific words in order. Once verified, your decentralized Web3 wallet is officially active.

    Unlocking the 20% Web3 DEX Fee Rebate

    OKX Web3 Wallet features an integrated DEX aggregator for swapping tokens across Ethereum, Solana, Arbitrum, and BNB Chain. You can link a separate 20% fee rebate to your Web3 wallet:

    1. Open your mobile browser and access the OKX Web3 20% Discount Portal (Code: DA999).
    2. Tap “Join Now” and confirm the redirect to open the OKX App.
    3. A confirmation modal will appear inside the OKX App. Tap “Join Now” to bind the discount code. All future decentralized swaps and bridge transactions on OKX DEX will automatically enjoy a 20% service fee reduction.
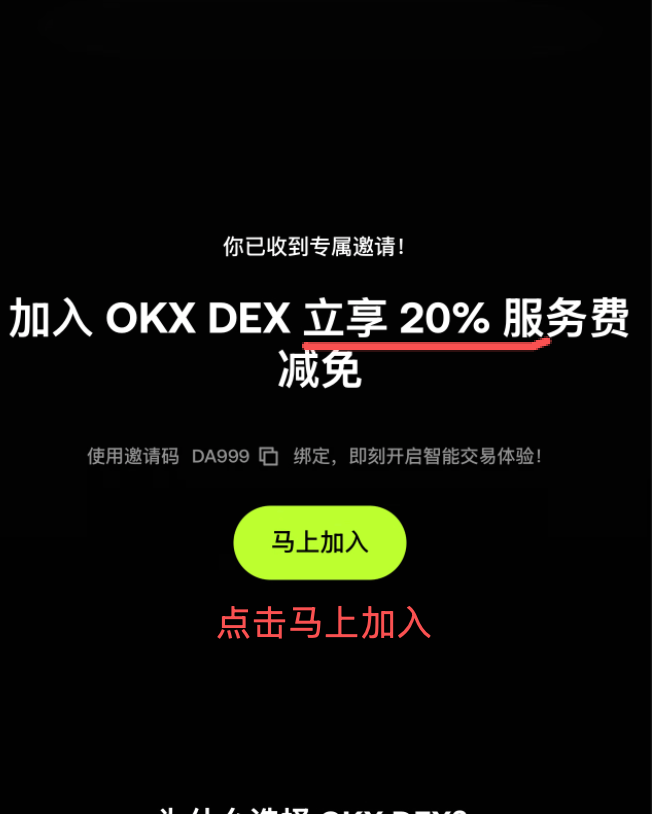
    OKX Web3 DEX 20 percent discount confirmation
    Bind the Web3 discount code to save 20% on all decentralized on-chain swaps.

    Summary Checklist for Digital Nomads

    • ☑ Sign up via Partner Link: Lock in your lifetime 20% exchange fee discount (Code: OY778).
    • ☑ Verify with Real Documents: Complete standard KYC with your national ID/passport.
    • ☑ Safe C2C Onramping: Trade exclusively in the Custom Selection tab, vet 98%+ merchants, and leave transfer remarks 100% blank.
    • ☑ Start with Spot or Convert: Avoid futures/leverage; acquire spot Bitcoin or stablecoins.
    • ☑ Air-Gap Your Web3 Wallet: Disconnect the internet, handwrite your 12 seed words on paper, and bind your Web3 DEX 20% rebate (Code: DA999).

    Disclaimer: Cryptocurrency markets fluctuate rapidly and carry inherent financial risks. This guide is for educational and technical instruction purposes only and does not constitute financial, investment, or legal advice. Always exercise risk management and only trade with capital you can afford to lose.
  • How to Keep an Active Hong Kong Phone Number for HK$15/Year: Club Sim eSIM Complete Guide

    How to Keep an Active Hong Kong Phone Number for HK$15/Year: Club Sim eSIM Complete Guide

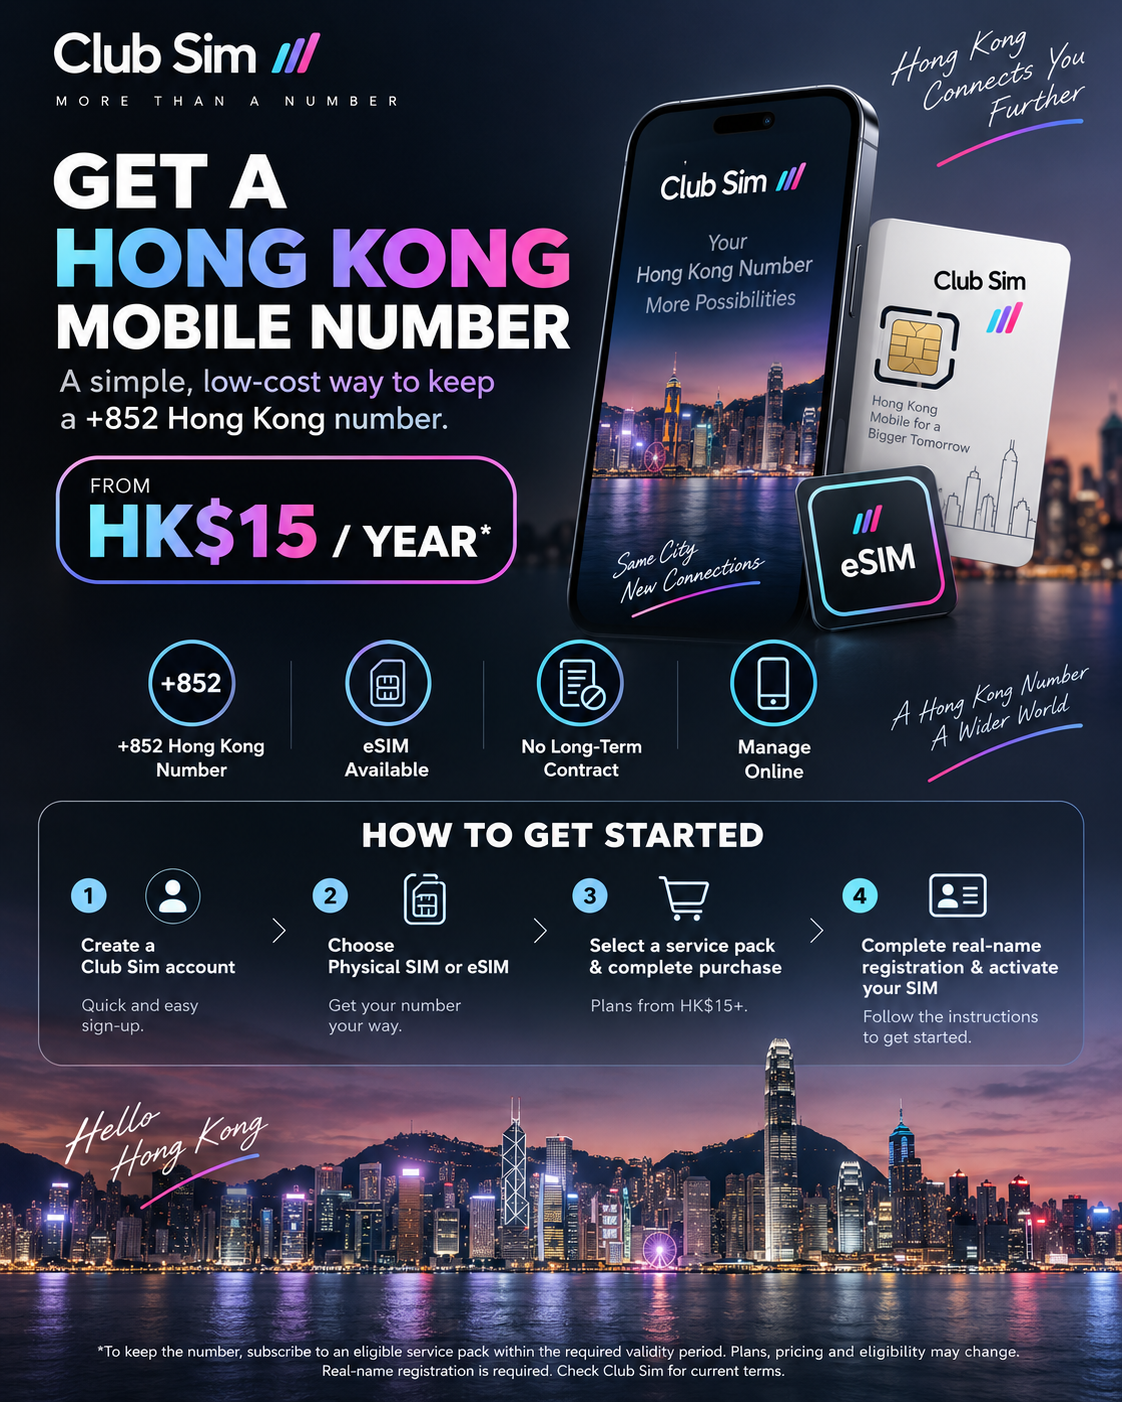
    For global digital nomads, international investors, and location-independent professionals, having access to a reliable, low-cost international phone number is an essential component of a borderless lifestyle. Among regional telecom hubs, a Hong Kong (+852) phone number is widely considered the holy grail: it operates with zero internet censorship, enables seamless registration across global fintech apps, brokerage accounts, crypto exchanges, and social platforms, and allows you to receive two-factor authentication (2FA) SMS codes worldwide completely free of charge.

    The challenge has always been maintenance costs. Traditional physical Hong Kong SIM cards often demand recurring monthly plans or expensive top-ups that expire quickly. Enter Club Sim, a digital sub-brand operated by Hong Kong’s largest telecommunications conglomerate, HKT (Hong Kong Telecom / CSL). With Club Sim’s unique pay-as-you-go architecture, you can keep a genuine Hong Kong cellular number active for just HK$15 per year (roughly $1.90 USD) — with zero monthly commitments.

    In this comprehensive guide, I will break down the underlying mechanics of how Club Sim’s validity extension works, how to navigate the initial HK$50 checkout threshold, how to pass Hong Kong’s mandatory Real-Name Registration (RNR), and how to set up an eSIM profile even if your phone lacks native eSIM hardware.

    Keep an active Hong Kong phone number for HK$15 per year with Club Sim eSIM
    Club Sim eSIM: Maintain a legitimate Hong Kong +852 mobile identity for under $2 a year.

    The Underlying Mechanics: Why Club Sim is the Ultimate Nomad SIM

    Before jumping into the purchase flow, understanding how Club Sim operates technically will help you avoid costly mistakes:

    1. The Validity Extension Mechanism (Why HK$15 Keeps It Alive)

    Club Sim does not charge a fixed monthly subscription. Instead, your mobile number’s expiration date is tied strictly to the validity of your purchased service packs. Club Sim offers an “Asia Data Roaming Day Pass” for HK$15. While the actual high-speed data usage is calibrated on a 24-hour daily pass model once activated abroad, the purchased pass itself remains valid for a full 365 days in your account. The moment you purchase or renew this HK$15 pass, Club Sim automatically extends the entire SIM card and cellular number’s lifecycle by an additional 12 months.

    2. Free Global Inbound SMS

    As long as your number is active, incoming SMS messages — including verification OTPs from banks (HSBC, Wise, iFAST), brokers (Interactive Brokers, Futu, Tiger), social platforms (WhatsApp, Telegram, WeChat, X), and AI platforms (ChatGPT, Claude) — are 100% free to receive worldwide. Note that Club Sim no longer offers standalone outbound SMS packages; it is primarily designed as a high-value inbound receiving identity and roaming data tool.

    3. The First-Purchase Threshold Hack (HK$50 Rule)

    Club Sim enforces a minimum cart threshold of HK$50 for the initial new SIM purchase. You cannot simply check out with a single HK$15 pass on day one. To cross this threshold with maximum practical value, we pair a Mainland China/Macau Roaming Data Pack (HK$38 for 1GB, valid for 90 days) with an Asia Roaming Day Pass (HK$15, valid for 365 days). This totals exactly HK$53 (~$6.80 USD). For all subsequent annual renewals, the HK$50 minimum order threshold no longer applies — you can purchase single HK$15 passes directly.

    4. eSIM vs. Physical SIM (Crucial Distinction)

    Club Sim offers both physical SIM cards and digital eSIMs. However, physical Club Sim cards must be physically connected to a local Hong Kong cellular tower to activate. If you are ordering from outside Hong Kong, you must select the eSIM profile, which delivers an instant QR code via email and can be activated remotely anywhere in the world.

    Prerequisites: What You Need Ready

    1. eSIM-Capable Device: An unlocked smartphone supporting digital eSIM (iPhone XS or later, Google Pixel, modern Samsung Galaxy). Tip for physical-SIM-only phones: If your device lacks native eSIM hardware (such as Mainland Chinese dual-physical-SIM iPhones), you can use a programmable smart card like Xesim (X2 Pro) to burn the Club Sim eSIM profile directly onto a physical card.
    2. Identity Document for Verification: A valid international passport or Hong Kong/Macau Exit-Entry Permit for the legally mandated Real-Name Registration.
    3. Payment Method: Standard Alipay, WeChat Pay, or an international credit/debit card (Visa, Mastercard).

    Step-by-Step Purchase Walkthrough

    Step 1: Access the Club Sim Portal

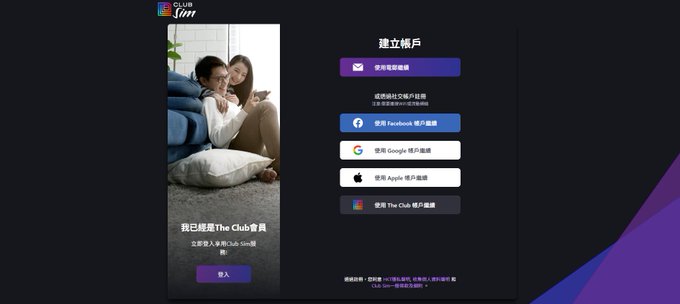
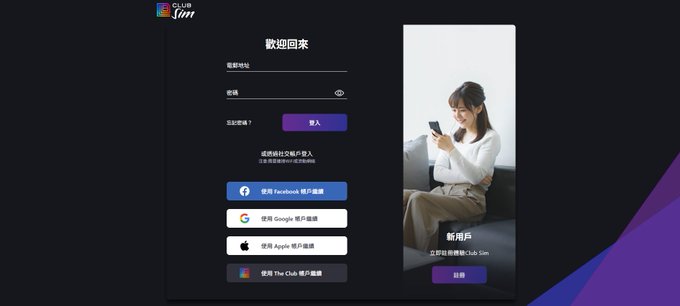
    Visit the official Club Sim website. On the top navigation bar, locate the new user onboarding section and click “New User / Join Club Sim” to initiate the registration.

    Club Sim new user portal screen
    Navigate to the Club Sim registration page.

    Step 2: Create Your Account

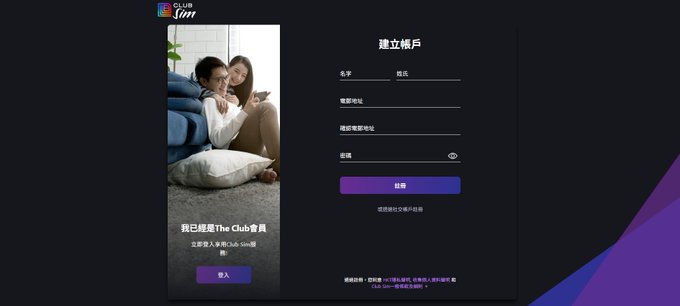
    Choose “Continue with Email”. Enter your primary email address, choose a secure password, and enter your First Name and Last Name in English/Pinyin. Make sure your name spelling matches your passport exactly, as this ensures instant verification during the subsequent KYC review.

    Select email registration on Club Sim
    Choose email registration to ensure seamless delivery of your eSIM profile.
    Club Sim account registration form
    Input your legal name matching your identity document.

    Step 3: Email Verification (Crucial Next Step)

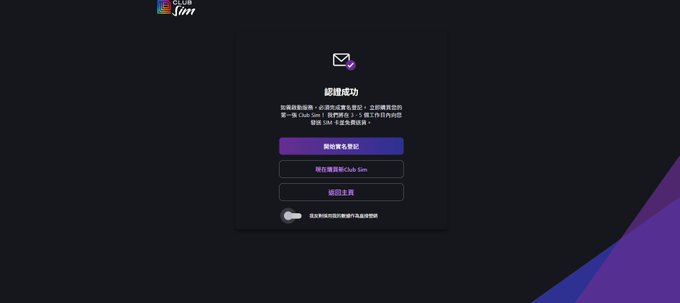
    Check your inbox for a verification email from Club Sim and click the confirmation link. You will be redirected to an “Authentication Successful” screen displaying two options:

    • Buy New Club Sim Now
    • Start Real-Name Registration

    Crucial Rule: Click “Buy New Club Sim Now” first! Do not attempt Real-Name Registration yet — you do not possess an active SIM card or ICCID number to bind until your order is placed.

    Club Sim authentication successful screen
    Click ‘Buy New Club Sim Now’ before attempting real-name registration.

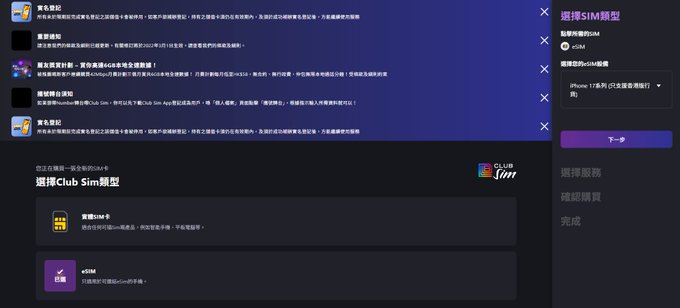
    Step 4: Select eSIM Profile

    When prompted to select your SIM type, select eSIM. The platform will ask for your phone model; simply choose your device model from the dropdown or pick a general compatible model. Tap continue.

    Select eSIM profile type on Club Sim
    Select digital eSIM for remote, instant over-the-air activation.

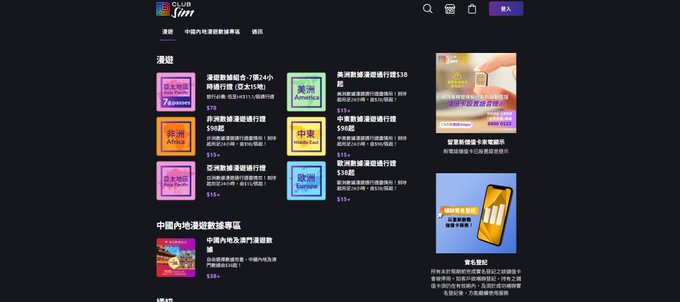
    Step 5: Apply the HK$53 Cart Strategy

    You will now arrive at the service catalog. Remember, your order total must reach at least HK$50 to unlock checkout. Follow this exact combination:

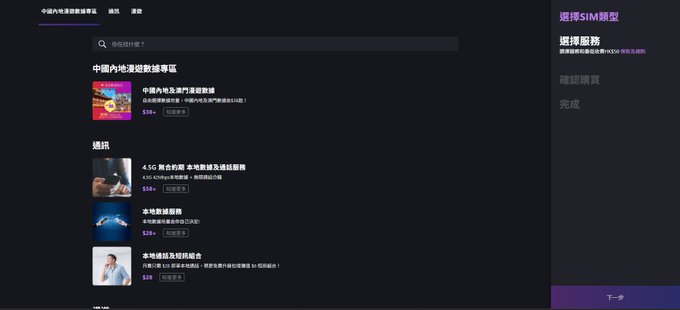
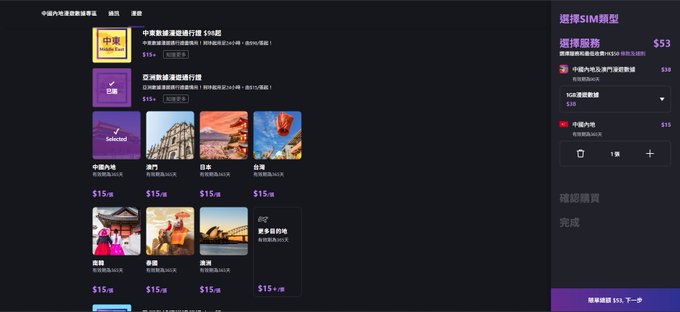
    1. Navigate to “China & Macau Data Roaming” and select the 1GB Data Pack (90-day validity) for HK$38.
    2. Navigate to “Data Roaming Day Pass”, choose Asia, and select the HK$15 Pass (365-day validity).

    Your cart will total exactly HK$53, which clears the platform minimum effortlessly.

    Club Sim service categories
    Explore roaming data packs to assemble your HK$50+ cart.
    Select China and Macau roaming pack HK$38
    Add the HK$38 data pack (1GB, 90-day validity).
    Add Asia data roaming pass HK$15
    Add the HK$15 Asia Day Pass with 365-day validity to lock in your annual number extension.

    Step 6: Review Order & Checkout

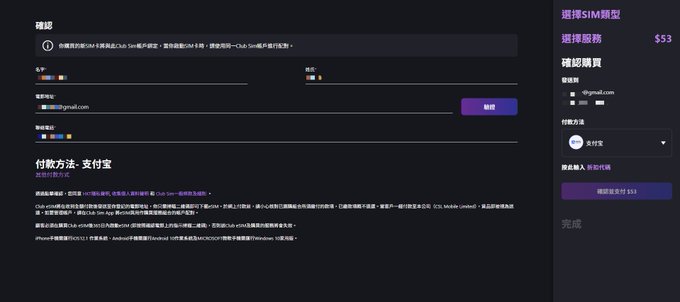
    Review your order summary (HK$53). Enter your contact email and phone number. Make sure to click the “Verify” button next to your email address, as this is where your eSIM installation QR code will be delivered. Select your preferred payment channel (Alipay, WeChat Pay, or credit card) and complete checkout.

    Club Sim order confirmation screen
    Confirm the HK$53 total and verify your delivery email address.
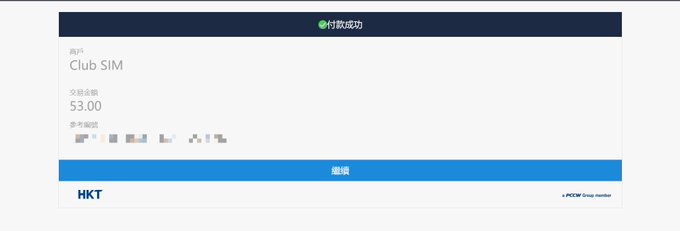
    Payment success confirmation screen
    Payment confirmed via HKT billing gateway.

    Step 7: Retrieve Your eSIM Profile & Order Details

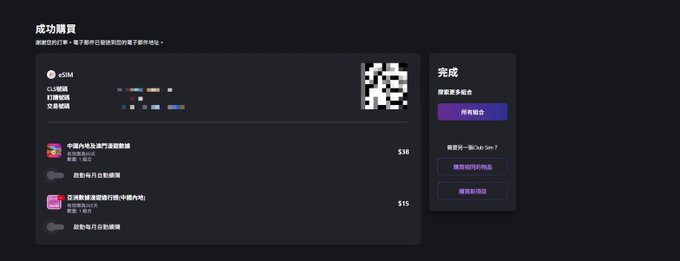
    Upon payment completion, the screen will display your eSIM QR Code, along with your Order Number, Transaction ID, and ICCID Number. Take a high-resolution screenshot and store these identifiers securely. A duplicate confirmation containing the eSIM QR code will also arrive in your email inbox.

    eSIM QR code and order receipt screen
    Save your eSIM QR code and order receipt details immediately.

    Part 2: Real-Name Registration (RNR) Compliance

    Under Hong Kong statutory regulations (Telecommunications Ordinance), all cellular SIMs operating on local spectrum must undergo mandatory Real-Name Registration before service activation. The verification process is automated, paperless, and typically clears within 3 to 5 minutes:

    1. Download the official Club Sim App from the App Store or Google Play (or access the RNR link provided in your confirmation email).
    2. Scan your eSIM QR code or manually enter your ICCID number to bind the purchased card to your user account.
    3. Select your document type: choose Passport (international passports are universally accepted).
    4. Grant camera permissions and snap a clear photo of your passport’s personal bio page. The system’s OCR will automatically parse your legal name, document number, and date of birth.
    5. Review the parsed data, submit, and complete the quick live facial recognition check if prompted.
    6. Within minutes, you will receive an SMS and email notification confirming: “Real-Name Registration Successful”. Your dedicated +852 mobile number will now appear in your app dashboard.

    Annual Maintenance: Keeping Your Number Alive for HK$15/Year

    Here is the secret to retaining your Hong Kong number indefinitely on a shoestring budget:

    • The Renewal Strategy: Approximately 15 to 30 days before your 365-day validity period expires, log into the Club Sim app and navigate to the data roaming store.
    • Purchase a Single HK$15 Pass: Select the Asia Data Roaming Day Pass for HK$15. Because this is a renewal purchase on an existing card, the initial HK$50 minimum cart restriction does not apply.
    • Instant 1-Year Extension: The moment payment clears, your number’s active lifespan is extended by another 365 days.
    • Pro Tip on Reminders: Set a recurring reminder in Google Calendar or Apple Reminders 15 days before your annual expiration date. If a number lapses past its grace period, telecom regulations require the carrier to recycle the number back into the public pool, and recovery is impossible.

    Frequently Asked Questions for Digital Nomads

    Can I receive SMS codes from WhatsApp, Telegram, and international banks?
    Yes. Club Sim operates on HKT’s tier-1 network routing. Inbound SMS verification from global tech giants, banking institutions, and social networks is fully supported and completely free of charge regardless of where in the world you are located.

    Can I make outbound phone calls or send text messages?
    Club Sim is primarily optimized as an inbound verification number and roaming data SIM. While local Hong Kong calling can be purchased as an add-on, it does not support international roaming voice calls or outbound SMS packages at this time.

    What if my phone only supports physical SIM cards?
    If you use a phone with physical-only SIM slots (such as dual-nano-SIM iPhones sold in Mainland China), you cannot scan an eSIM QR code directly into your phone settings. The proven workaround is using a programmable physical chip such as Xesim (X2 Pro). You write the Club Sim eSIM profile onto the Xesim smart card, insert it into your phone’s physical tray, and enjoy full eSIM capability seamlessly.


    Disclaimer: Package prices, bundle structures, and regulatory registration rules are subject to change by HKT and the Hong Kong Communications Authority. Always consult the official Club Sim portal for the latest real-time terms.

  • How to Open a UK Monzo Bank Account as a Global Digital Nomad: The Complete Mechanics & Guide

    How to Open a UK Monzo Bank Account as a Global Digital Nomad: The Complete Mechanics & Guide

    For global digital nomads, remote workers, and cross-border entrepreneurs, having access to Tier-1 banking rails in the United Kingdom is a massive advantage. Whether you need to invoice UK and European clients, access local Faster Payments (FPS), spend abroad without foreign transaction markups, or acquire a gold-standard Proof of Address (PoA), the UK banking system remains one of the world’s most reputable financial hubs.

    Among all UK financial institutions, Monzo Bank stands out as the most popular entry point. With over 9 million customers, full UK banking licensing, FSCS deposit protection, and an exceptionally intuitive app, Monzo has earned a cult following. More importantly for location-independent individuals, Monzo is famously accessible even if you have zero UK credit history.

    However, navigating Monzo’s onboarding as a global nomad requires understanding both the underlying mechanics of UK banking compliance and the tactical steps to ensure your application passes automated risk scoring. In this guide, I will break down the engineering logic behind Monzo’s verification systems, provide a screen-by-screen walkthrough, and share insider logistics for receiving and activating your card from anywhere in the world.

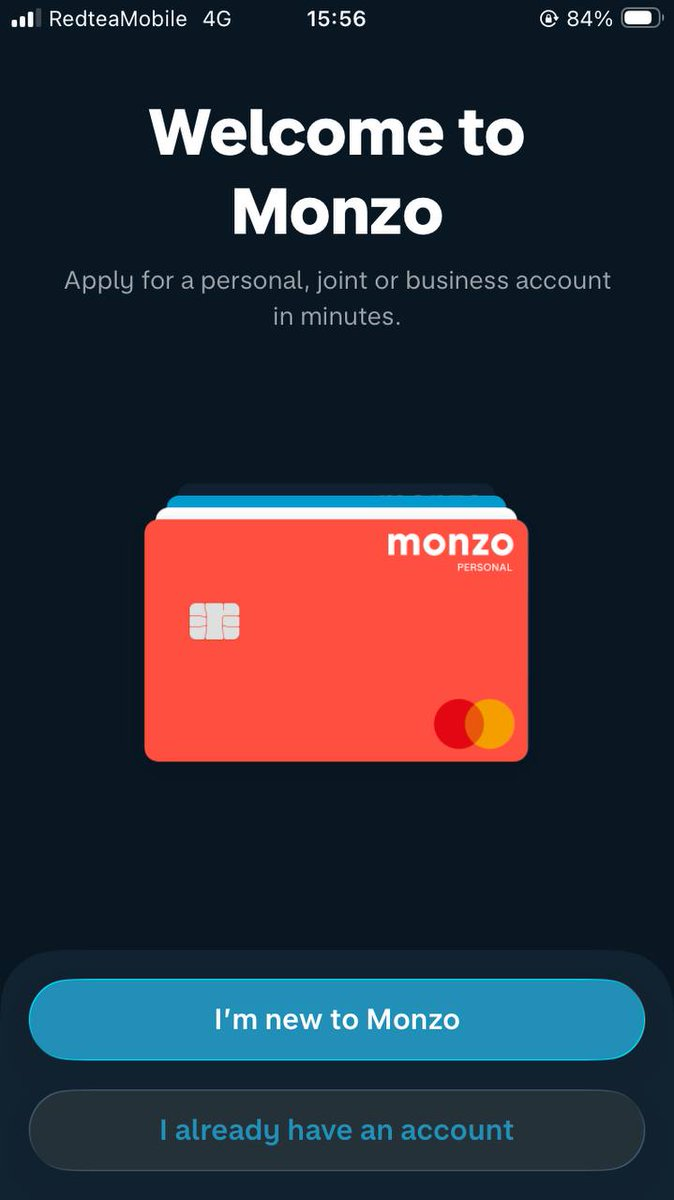
    Monzo mobile app welcome screen
    The Monzo mobile onboarding screen: fast and digital when approached correctly.

    The Underlying Mechanics: How Monzo’s KYC & Risk Engines Work

    To register successfully without triggering manual compliance reviews or immediate rejections, it helps to understand how UK neo-bank onboarding algorithms make decisions in real time:

    1. Telemetry & IP Fingerprinting (Why VPNs Fail)

    UK banks employ sophisticated fraud prevention engines (such as Sift and ThreatMetrix) that evaluate device integrity, cellular carrier parameters, and IP reputation upon app launch. Commercial VPNs and public proxy data centers are instantly flagged on fraud databases due to shared ASNs and WebRTC leaks. To present a genuine local connection, you need a clean, residential or cellular UK IP — for instance, through a travel eSIM profile (such as RedteaGo, Airalo, or local UK roaming data) where traffic breaks out naturally through a UK telecom gateway.

    2. The Royal Mail PAF & Physical Delivery as “Proof of Presence”

    Traditional high-street banks require utility bills, council tax statements, or tenancy agreements before opening an account. Digital challenger banks like Monzo innovate by using physical debit card delivery as a soft proof of address. Monzo cross-references the address you enter against the UK Royal Mail Postcode Address File (PAF) database. Because the physical card is mailed via standard second-class post without tracking, your ability to receive that card and input its 16-digit number acts as the physical handshake confirming your connection to that address.

    3. Automated AML Scoring: Avoiding the Enhanced Due Diligence (EDD) Trap

    During the signup flow, the app asks about your employment, expected monthly inflows, and housing situation. Many applicants make the mistake of over-declaring expected income or entering complex financial setups, which triggers automated Anti-Money Laundering (AML) flags requiring formal tax filings, wage slips, or Source of Wealth (SoW) documentation. Keeping your declared turnover conservative at the initial stage allows your profile to clear the automated tier smoothly.

    4. CRS & Tax Compliance: Why Honesty is Safest

    Monzo operates under the global Common Reporting Standard (CRS) and FATCA frameworks. You do not need to fabricate UK tax residency. Selecting your genuine home country citizenship and primary tax residence (e.g. China, or wherever your primary tax domicile lies) while maintaining a UK mailing address is completely supported by their system and avoids compliance perjury.

    Prerequisites Checklist for Global Nomads

    Before beginning your application, have these four assets prepared:

    1. Valid International Passport: A clear, unexpired passport with machine-readable biographical lines.
    2. Active UK Mobile Number (+44): Needed to receive one-time SMS verification codes (OTP). An active UK SIM (such as giffgaff) or compatible virtual cellular service is recommended.
    3. Clean UK Network Environment: A device operating over clean UK roaming/cellular data, free of active VPN proxies.
    4. Reliable UK Mailing Address: A residential address where physical mail can be collected on your behalf (e.g., a trusted friend, colleague, or dedicated mail receiver).

    Step-by-Step Monzo Registration Guide

    Step 1: Welcome Bonus & App Installation

    Open the referral registration portal on your mobile browser. Entering via an invite link locks in a welcome cash bonus (typically up to £50 credited once you make your first debit card payment within 30 days). Enter your mobile number, then redirect to the App Store or Google Play Store to install the official Monzo Bank application. Launch the app and tap “I’m new to Monzo”.

    Step 2: Email & Account Selection

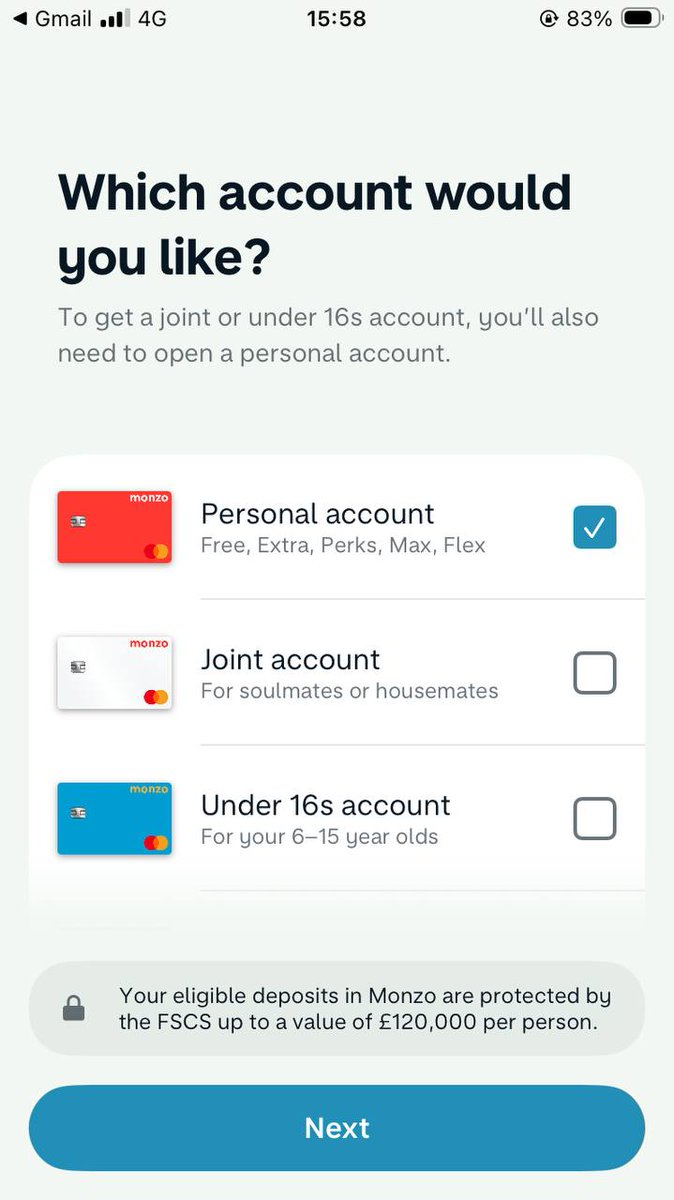
    Enter your primary email address. When prompted for account tiers, select the standard Personal account. This tier is completely free with no monthly maintenance fees, while still providing the full statutory £85,000 FSCS deposit insurance protection.

    Select Personal Account tier in Monzo app
    Choose the standard personal account tier to start.

    Step 3: Identity & Residential Postcode Entry

    Enter your core identification data:

    • Legal Name: Provide your First Name and Last Name matching the Pinyin/English spelling on your passport.
    • Date of Birth: Ensure day, month, and year strictly match your passport.
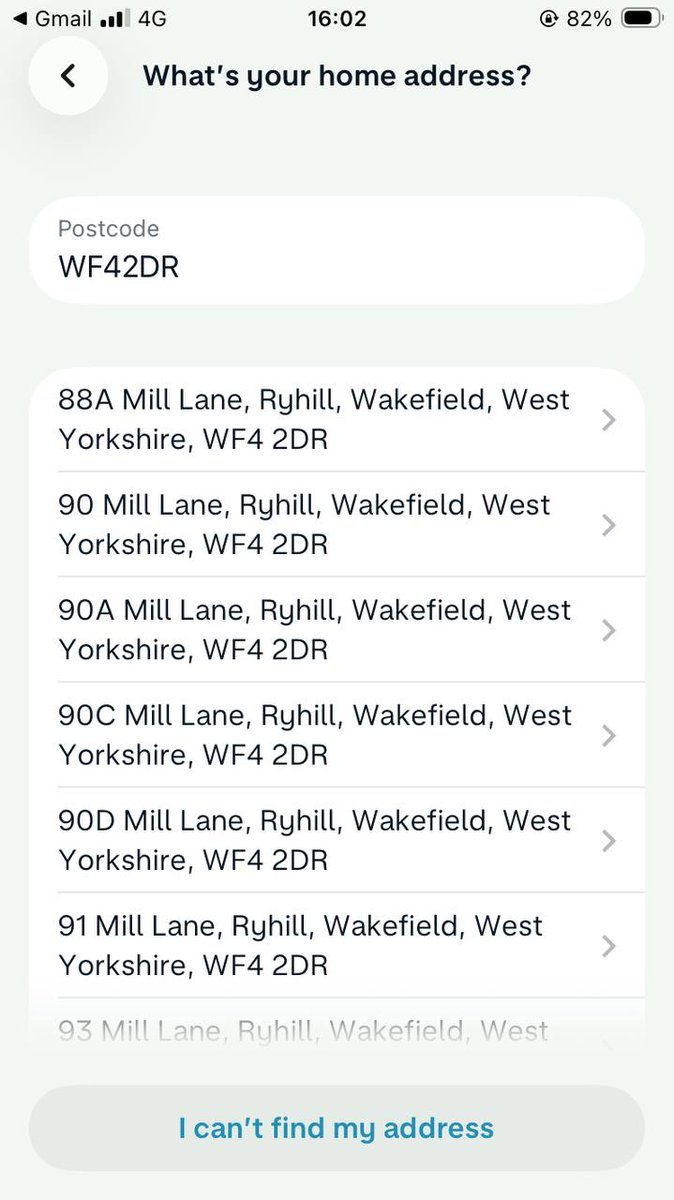
    • UK Address Lookup: Enter the UK Postcode of your designated mailing location. The app will pull matching street addresses from the Royal Mail database; select the exact apartment/house number.
    • Mobile Verification: Enter your UK phone number and submit the 6-digit SMS verification code.
    Monzo UK residential address lookup using postcode
    Look up your UK residential delivery address by Postcode.

    Step 4: Tactical KYC & Profile Optimization

    Here is where applying the right tactical choices keeps your application in the automated clearance lane:

    • Primary Citizenship: Search and select your true citizenship (e.g. China).
    • Employment Status: Select Full-time, and choose an industry and role that corresponds logically with your profile.
    • Annual Income: Pick a moderate, realistic middle-income bracket.
    • Housing Status (Pro Tip): Select Living with family and enter £0.00 for monthly housing expenditure, with 0 dependents. This explains why you do not pay direct tenancy rent on the property without requiring a formal lease agreement.
    • Intended Purpose: Check standard personal finance categories: day-to-day spending, online shopping, and transfers with friends.
    • First Payment Source & Turnover: Select Family or friends for the initial deposit source. Set anticipated monthly transaction amounts to a conservative tier (e.g. Less than £100). You can always scale up usage naturally once the account is established.

    Step 5: Document Scanning & Liveness Video Verification

    Identity verification involves two quick security checks:

    1. Passport Photo: Select your passport’s country of issue and take a clear, high-contrast photo of the biographical data page. Avoid glare on the plastic laminate.
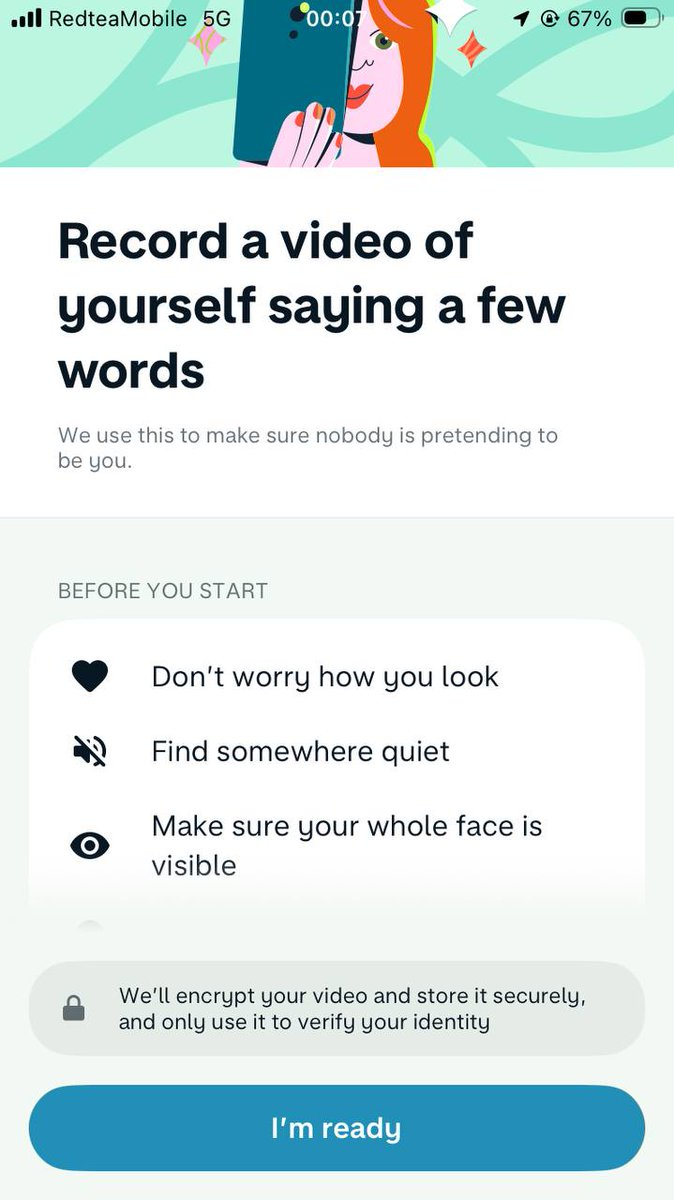
    2. Selfie Video Prompt: Record a brief 5-second video selfie. The app will display a short English script on screen (typically: “My name is [Your Name], I want a Monzo account”). Hold the camera steady at eye level, speak clearly, and ensure your entire face remains within the oval frame.
    Monzo video selfie identity verification
    Record a 5-second video selfie reciting the on-screen verification phrase.

    Step 6: Regulatory Declarations & FSCS Confirmation

    Complete the legal checkboxes:

    • FATCA Declaration: Confirm you are not a US citizen or US permanent resident.
    • Tax Residency: Select your actual tax residence country (e.g. China).
    • FSCS Protection Notice: Tap through to confirm you have reviewed the Financial Services Compensation Scheme terms, protecting your eligible retail funds.

    Step 7: Security PIN & Debit Card Dispatch

    Confirm the cardholder name to be embossed on your card and double-check the delivery address. Choose a secure 4-digit card PIN (memorize this code, as it is required for all chip-and-PIN retail terminals and global ATM cash withdrawals). Enable biometric security (Touch ID/Face ID) for daily app access.

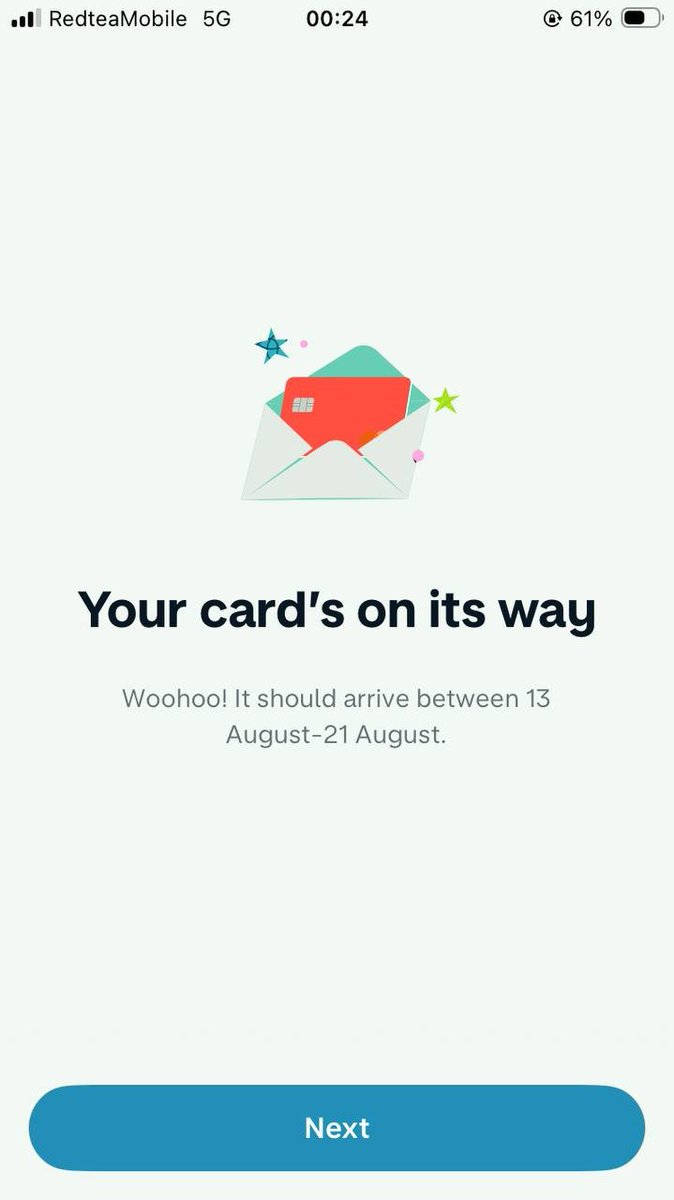
    Upon final submission, the app will update to “Your card’s on its way”, displaying the estimated Royal Mail arrival window (typically 2 to 7 business days).

    Monzo card dispatched confirmation
    Your physical Monzo debit card is printed and dispatched via standard post.

    The Activation Hurdle: Physical Card Handshake

    A crucial technical nuance many online tutorials miss: Monzo accounts remain in a locked, pending state until the physical card is confirmed. Unless your digital footprint achieves rare instant Apple Pay approval, your UK Sort Code and Account Number are not operational until you complete the card activation flow.

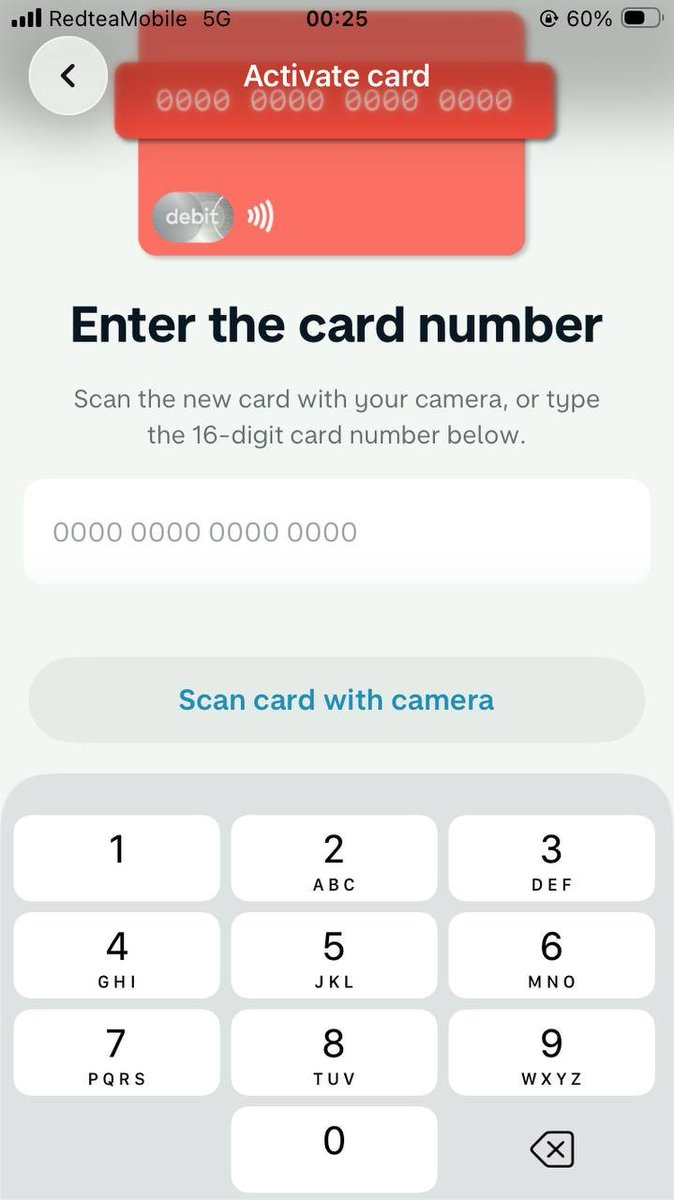
    Monzo 16-digit card activation screen
    To activate your account, scan or input the 16-digit card number printed on the physical card.

    When the envelope is delivered to your UK address, you have two practical operational pathways as a nomad:

    • Method A: Photo Activation (Fastest): Have your trusted UK contact carefully open the envelope and send you a high-resolution photo of the front and back of the debit card. Open the Monzo app, tap “Activate card”, and manually enter the 16-digit card number. Your account unlocks instantly, providing your live Sort Code and Account Number. You can immediately link the card to Apple Pay or Google Wallet for contactless payments.
    • Method B: International Forwarding: Have your contact forward the physical card to your overseas location via tracked international courier (DHL, FedEx, or Royal Mail Tracked). Once delivered into your hands, scan the card with your phone’s camera.

    Pro Tip for Working with UK Friends: Clarify to your contact in advance that Monzo is a debit account, not a line of credit or loan. Friends unfamiliar with fintech often panic thinking they are co-signing financial liability; reassuring them that it is simply an envelope containing a prepaid/debit card prevents last-minute refusal at the doorstep.

    The Hidden Nomad Superpower: Monzo Statements as Proof of Address (PoA)

    Why do nomads put in the effort to establish a Monzo account? Beyond everyday spending, the real strategic value is Tier-1 Proof of Address generation.

    On the 1st of every calendar month, Monzo automatically compiles an official downloadable PDF statement. This document displays:

    • Your full legal name
    • Your registered UK residential address
    • Official Monzo Bank letterhead and registration details (Bank of England / PRA / FCA regulated)
    • Your UK Sort Code and Account Number

    Because Monzo is a fully licensed UK commercial bank (rather than a simple Electronic Money Institution like Revolut or Wise), its monthly bank statements are universally recognized by major cryptocurrency exchanges (Binance, Kraken), global stock brokerages (Interactive Brokers, Charles Schwab), and international payment processors as valid Proof of Address, unlocking services that are otherwise inaccessible to non-residents.

    Alternative Options: When You Don’t Have a UK Address

    If you genuinely cannot secure a reliable UK mailing address to receive the physical card, do not use fake addresses from a map — your card will be returned as undeliverable and your account will be shuttered. Instead, consider these two battle-tested banking alternatives engineered specifically for non-residents:

    • iFAST Global Bank — A fully licensed UK commercial bank that officially onboards non-UK residents online from overseas. You do not need a UK address; you apply directly with your home country passport and utility bill. You receive dedicated UK Sort Codes, personal Account Numbers, and international multi-currency IBANs backed by full FSCS protection. Check out my full step-by-step walkthrough for opening details.
    • Wise — The gold standard multi-currency clearing platform for digital nomads. While an EMI rather than a full bank, Wise gives you local UK Sort Code details to receive GBP seamlessly, alongside mid-market currency exchange rates across 40+ currencies.

    Disclaimer: Banking policies, compliance algorithms, and terms of service evolve continuously. Always review Monzo’s official customer agreements during application.